The single decision that most often separates a clean custom bandana from a disappointing one is not the fabric or the print method. It is how the artwork file was built before it ever reached the press. A logo that looks crisp on a screen can end up trimmed by the hem, muddied by a bad color build, or stretched a quarter inch off-square once the fabric relaxes. Getting the file right is the cheapest quality control you have, and it takes about fifteen minutes of planning.
Start with the finished size, then design smaller
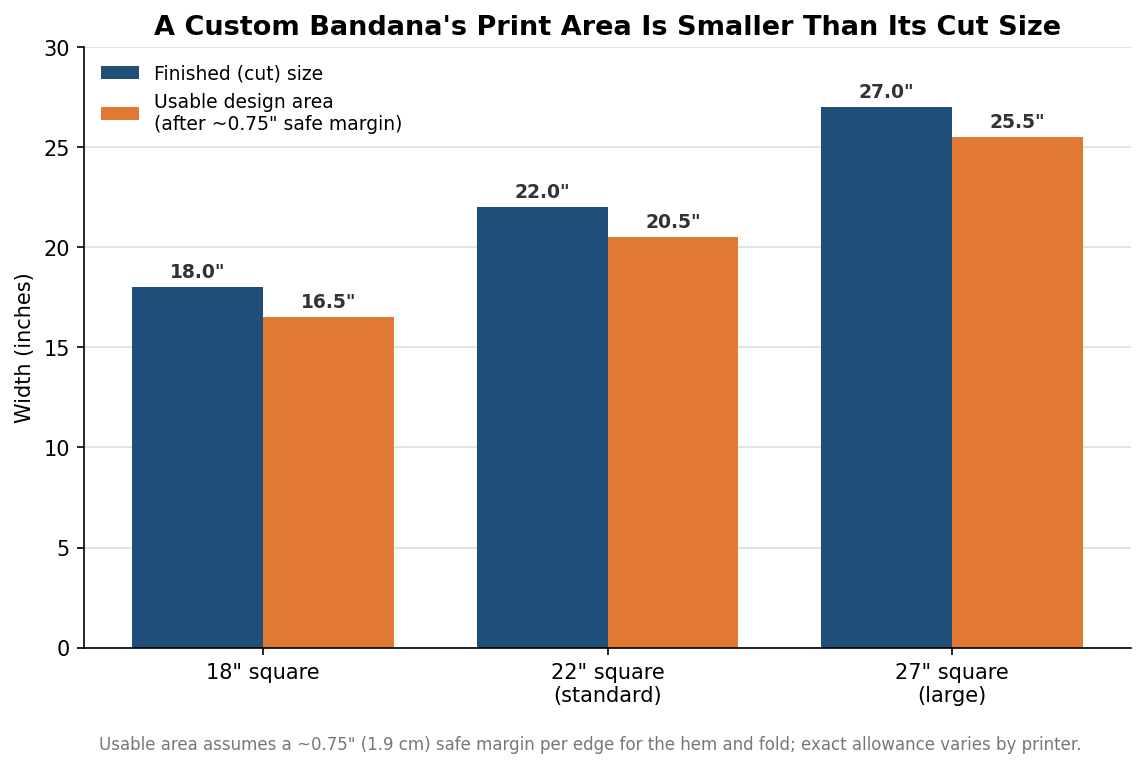
A bandana’s cut size is not its printable size. The most common finished square is 22 by 22 inches, with an 18-inch size used for pets and smaller giveaways and a 27-inch size favored for headwraps and larger apparel looks. Whatever the cut dimension, the fabric loses usable area at every edge to the rolled or stitched hem, and it loses a bit more to the fold lines that a folded bandana naturally creates. A practical rule is to keep critical elements — text, a logo mark, a registered trademark — inside a safe margin of roughly 0.6 to 0.8 inches (about 1.5 to 2 cm) from each edge. On a 22-inch square that leaves a usable design zone near 20.5 inches; on a 27-inch square, about 25.5 inches. The chart below shows how much the safe margin subtracts across common sizes.
Screen printers reinforce this at the shop level by sizing the screen frame two to three centimeters smaller than the fabric, which is another way of saying the design simply cannot run to the raw edge on a spot-color job. If your layout depends on ink reaching the very corner, that is a signal you are heading toward an edge-to-edge process rather than a bordered one.
Decide between an edge-to-edge and a bordered layout
Bandana designs fall into two families, and the file has to be built for one or the other from the start. A bordered layout places the artwork inside a defined field with unprinted fabric around the perimeter. It is the more forgiving option: small shifts during printing hide inside the margin, registration is easier, and a single or two-color screen job handles it cleanly. An edge-to-edge layout, where color and pattern run all the way to the cut line, has no margin to hide behind, so it needs bleed — extra artwork extending past the trim line so that no unprinted sliver appears if the cut wanders slightly. Classic paisley bandanas are edge-to-edge by nature, and reproducing that all-over coverage in a custom design almost always pushes the job toward dye sublimation or an all-over print method rather than a placed screen print. If you want the traditional full-coverage look, build the file with bleed and expect a full-color process; if you want a logo on plain ground, a bordered spot-color file is simpler and usually cheaper.
Match the print method to the art, not the other way around
The artwork itself tells you which press it belongs on. Screen printing lays down solid spot colors and is the workhorse for logos, wordmarks, and simple graphics. It reproduces Pantone (PMS) values accurately, holds up to washing, and gets more economical as quantities climb, but each color is a separate screen and a separate registration step, so a design’s color count directly drives setup and price. Keep spot-color art to a small, deliberate palette — two or three colors covers most brand marks — and specify exact PMS numbers rather than leaving the printer to guess from an RGB file. Medium-weight bandanas are commonly printed through a mesh in the 120 to 150 threads-per-inch range, which balances ink coverage against fine detail.
Dye sublimation, by contrast, is the route for photographic images, gradients, tight color blends, and any edge-to-edge coverage. It prints full color without per-color screen charges, which makes it the sensible choice when a design has more than a handful of colors or a continuous-tone background. The tradeoff is that sublimation bonds to polyester, so a cotton-feel bandana and a photographic full-color print are usually competing goals. Knowing which of these two processes your art requires before you finalize the file prevents the most common back-and-forth with a printer.
Send files a printer can actually use
Vector files are the ideal deliverable because they scale to any bandana size without losing sharpness. Supply .ai, .eps, or a vector .pdf whenever the art is a logo or line-based graphic, and convert all fonts to outlines so the shop does not need your typefaces. When the design is photographic and destined for sublimation, high-resolution raster art works, but build it at 300 DPI at the final print dimension — not at thumbnail size scaled up. Include your Pantone references in the file or in a note, flag any element that must match a brand standard exactly, and separate front and back art clearly if you are ordering double-sided. A reputable printer reviews every file before it runs, but that review catches problems faster when the file arrives correctly built.
Build in shrinkage and always approve a proof
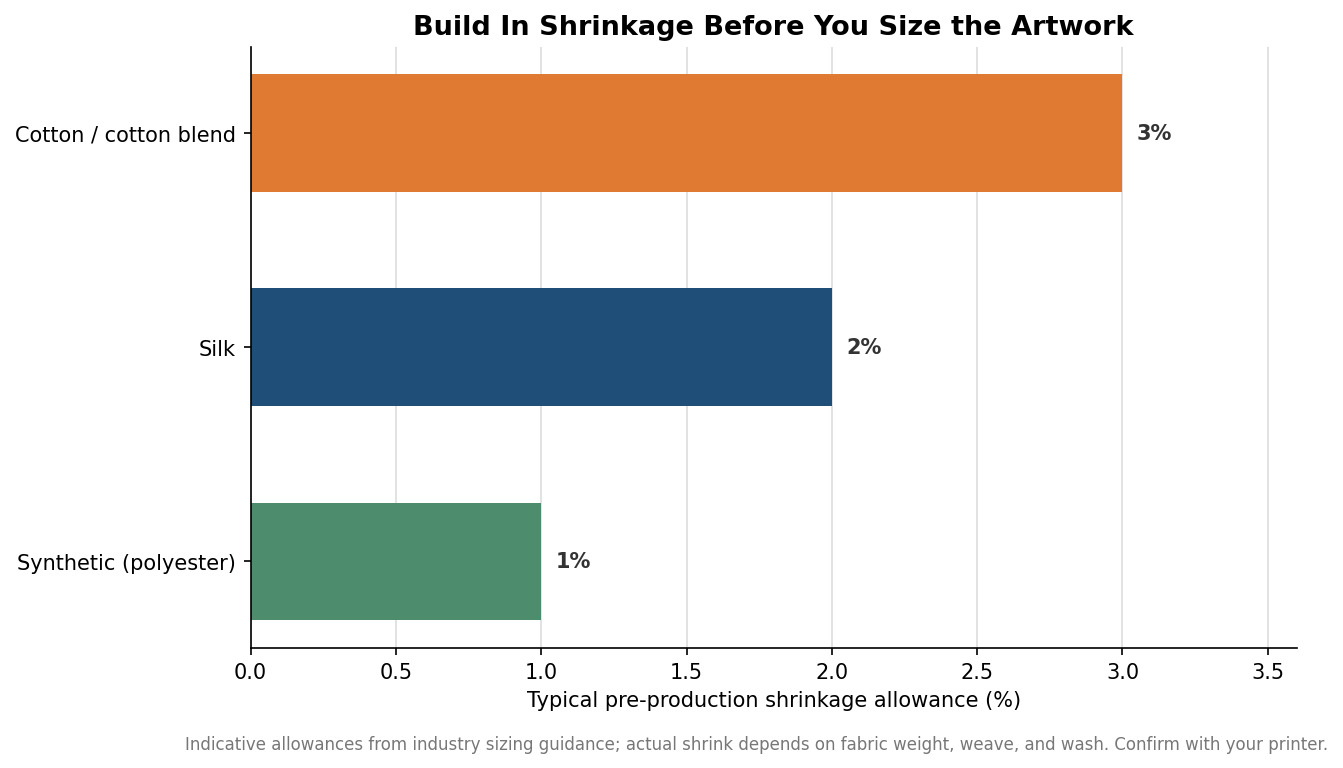
Fabric moves. Cotton and cotton blends can shrink noticeably after their first wash, and pre-production allowances commonly run around 3 percent for cotton, 2 percent for silk, and about 1 percent for synthetics. That movement is exactly why the safe margin matters: a design sized to the raw edge on a cotton bandana can end up looking cramped or off-center once the piece relaxes and is hemmed. The chart below summarizes typical allowances by material.
None of this replaces a physical or digital proof. Before a full run, confirm the print placement, the color build, and the position of any text relative to how the bandana will actually be folded and worn — a mark centered on a flat square can land awkwardly once the bandana is tied. Treat the proof as the last and most important checkpoint. Sizes and allowances here are indicative and vary by printer and fabric, so use them to plan the file, then let the approved proof confirm the result.