A custom bandana looks simple, but the order form hides four decisions that determine whether the finished piece feels like a keeper or a giveaway nobody keeps: the size, the fabric, the print method, and the quantity. Get those aligned and a bandana becomes a genuinely useful branded item. Get them wrong and you pay for 500 squares of fabric that pill after one wash or print muddy in the middle. Here is how to specify each one so the quote you get back matches what you actually want.
Start with size, because it drives everything else
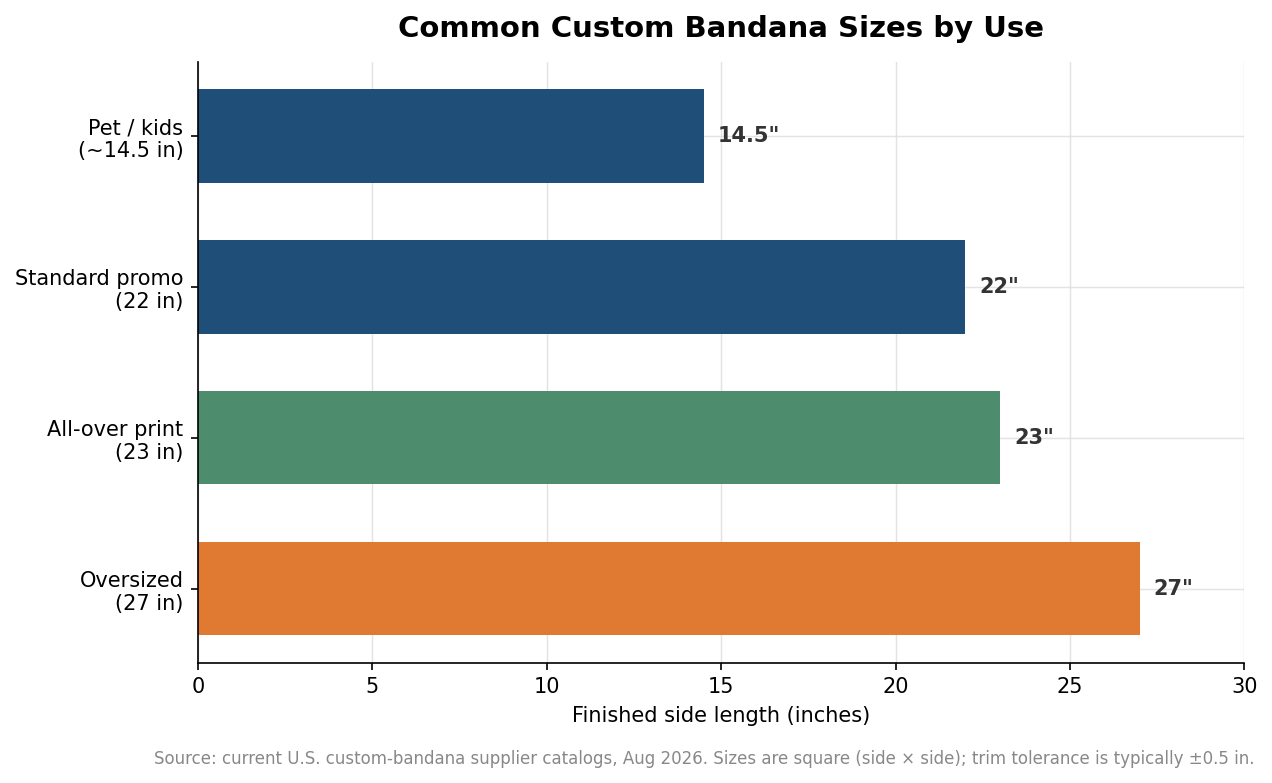
Bandana size is measured as a square: the side length before hemming, so a “22-inch” bandana finishes at roughly 22 by 22 inches with a rolled or stitched edge taking a small amount off each side. Four sizes cover almost every order. The 22-inch square is the default promotional and fashion size, big enough to fold into a headband, face covering, or pocket square. The 27-inch is the oversized option people reach for when the bandana needs to work as a scarf, a dog-walking tie for a large breed, or a wall-hung piece. The 14 to 14.5-inch small square suits pets, children, and wrist ties. A dedicated 23-inch all-over size shows up specifically for edge-to-edge printed designs.
Size interacts with print coverage, so decide it before you finalize artwork. A logo that reads well on a folded 22-inch bandana can disappear when the square is worn open, and an all-over pattern designed for 23 inches will crop awkwardly if you drop to 14.5. Expect a cut tolerance of about half an inch in either direction; that is normal for woven cotton and not a defect.
Match the fabric to how the bandana will be used
Fabric is where absorbency trades off against color. One hundred percent cotton is the traditional choice: soft, breathable, and absorbent, which matters if the bandana will actually be worn against skin or used to wipe sweat. Its trade-off is that cotton takes dye less vividly than synthetics and can shrink a few percent in the first hot wash, so build a little slack into any tight-fitting use. Cotton poplin is a crisper, tighter weave that holds a printed edge a bit more sharply while keeping most of cotton’s comfort.
On the synthetic side, 100 percent polyester is the fabric to specify when color is the point. Polyester accepts dye-sublimation printing, which bonds the dye into the fiber for bright, edge-to-edge, wash-durable color that cotton cannot match. The cost is comfort and absorbency: poly feels slicker and wicks rather than soaks. Poly-cotton blends sit in the middle, giving you better color than pure cotton with more softness than pure poly. As a rule of thumb, choose cotton when the bandana is worn or wiped with, and polyester when a full-color graphic has to look saturated across the whole square.
Pick the print method your artwork actually needs
The print method follows directly from your design and fabric, not the other way around. Screen printing pushes ink through a mesh stencil, one screen per color. It is the workhorse for one, two, or three solid spot colors and gets cheaper per piece as the run grows, because the setup cost spreads across more units. It is a poor fit for photographs or gradients. Digital and direct-to-garment printing lay full-color artwork straight onto cotton with little setup, which is why many shops offer them with no minimum; the trade-off is a higher per-piece cost that does not fall as steeply with volume.
Dye sublimation is the method for full-color, edge-to-edge designs, but it requires polyester fabric to work, so choosing it also chooses your material. Direct-to-film transfers are a newer option that handle detailed color on a range of fabrics. The practical takeaway: a two-color logo on cotton points to screen printing, a photographic or all-over pattern points to sublimation on poly, and a small full-color run with no minimum points to digital.
Quantity, lead time, and getting the artwork right
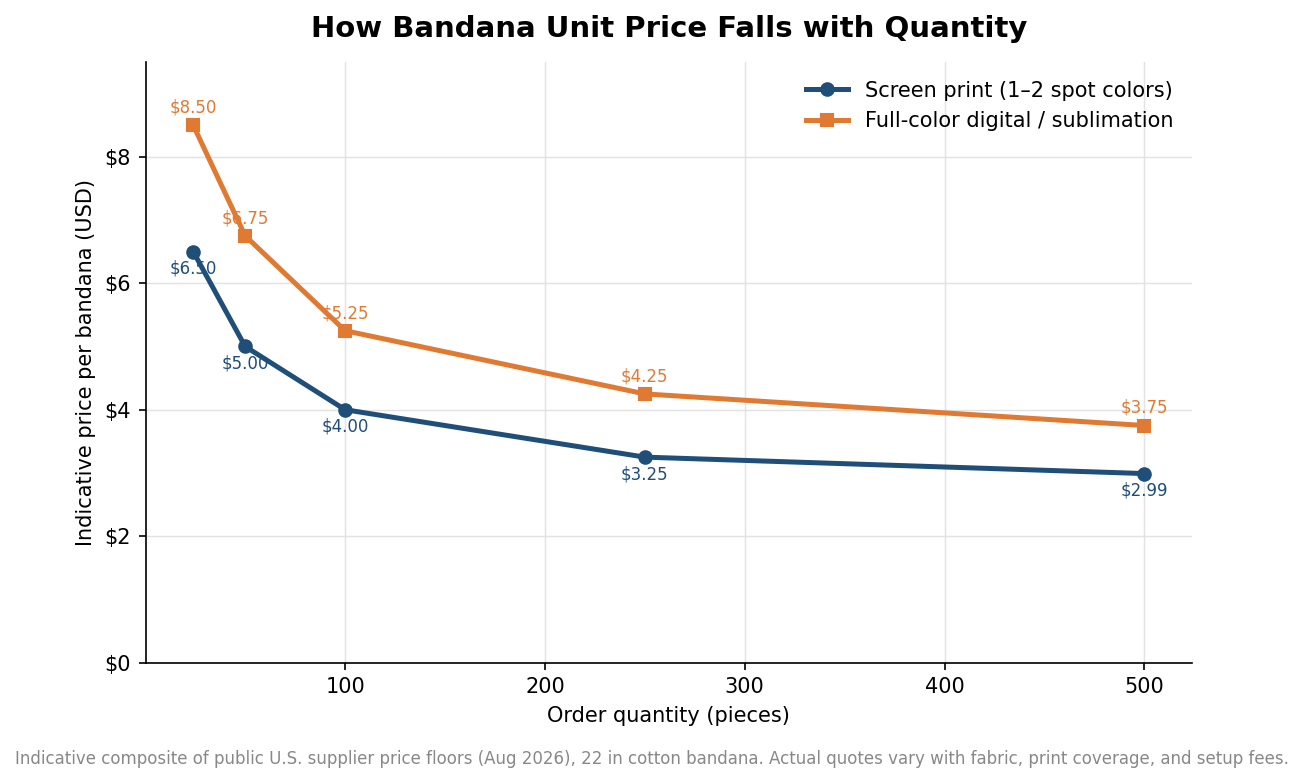
Minimum order quantities track the method. Digital and DTG printing frequently carry no minimum, which is what makes a run of a dozen feasible. Screen printing typically starts around six pieces because of the per-color setup, and all-over or sublimated printing often begins near twelve. Unit price falls meaningfully as quantity climbs: public supplier pricing for a standard cotton bandana commonly runs from the mid-single dollars at small quantities down toward roughly three dollars each in the hundreds, though the exact figure depends on size, print coverage, color count, and any setup fee. Treat those as indicative market ranges, not a quote.
On timing, plan for production of about six to eight business days at faster shops and up to one to three weeks elsewhere once artwork is approved, with rush service sometimes available in three to four business days at added cost. Build in a day or two on top for a digital proof; approving one is the single easiest way to avoid an expensive reprint. Supply artwork as vector where possible, or at 300 dpi at final size, with your brand colors specified as Pantone references so spot-color screen printing matches across reorders. Add a small bleed for all-over designs and keep critical text away from the edges, since that half-inch cut tolerance will occasionally clip anything crowded into the margin.
Specify those four things clearly, in that order, and the rest of the order tends to fall into place. Size sets the canvas, fabric sets the feel and color ceiling, print method follows the artwork, and quantity sets the price. A supplier can quote confidently from that, and the bandanas that show up will look like what you pictured.